

Due to so many task that we carry out with our smartphone. Some of the activities which we normal use of phone’s for includes calls, text messages, social networking, photos, quick searches, streaming music, watching video etc. Due to all this task that we engage our smartphone’s our battery life seems to drain so fast. To fix this issue of battery drain there is an app available in the google play store which can help to optimize your android phone’s battery life. A free app called Greenify can fix that.
Greenify app actually has to version which are the free version which you can download here and also the paid version which you can also download here to follow along with this post.
Alright, now that we’ve cleared that up, let’s get started. The first thing you’ll need to do is install the Greenify app—you can find it by clicking here or simply searching for “Greenify” in the Play Store on your device.
The paid Donation version of the app offers users with a few additional experimental features, and it offers users the opportunity enjoys the originality of their income value for the product. For the tutorial sake we are going to be covering the free version of this app but I advise you to get the paid donation version in order to encourage the effort of the developer of this app and also encourage them to add more timely.Without wasting much time let’s now move on how to use greenify app on your android smartphone,just follow the steps accordingly and get your android device battery optimize to last more longer.
Procedure To Set Up Greenify App for Non-Rooted Device(Phone)
After installing and launching Greenify, a screen with pop-up explaining the aim of the app and as a user of this app there are series of setup that you need to undergo for the effective usage of this great optimizer app after going through the explanations and you think you are satisfied with features then click on Next button to proceed with the setup.

The next screen will come up with the working mode of your device whether rooted or Non-Rooted but as we have stated earlier on the heading that this is for non-rooted device then select My device is not rooted and click on Next to proceed to the next process.

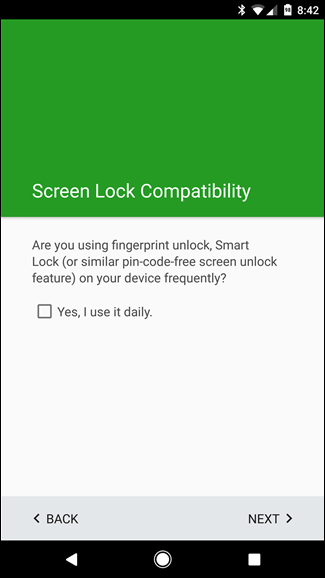
In case your new smartphone has a fingerprint reader or you make use of Smart Lock to prevent access to your device then you need to input your PIN or password with each unlock, if yes then check the checkbox provided and hit Next to continue with the process
Greenify carryout some task after you might have turn off your device screen due to this, the “Power button instantly locks” settings in Android’s Security menu will need to be disabled. Click on “Verify” button next to this entry to jump straight into the Security menu.
NOTE:This may vary based on the device, the procedure may differ in the step but if you get to this step use your initiative to avoid mistakes.


To remove the power button instantly off, toggle off the setting that reads “Power button instantly locks.”

Now we need to verify is auto-lock. In this step there is a little delay just like five minutes of delay but tap the “Verify” button to go to Android’s Security settings.


To proceed with this step, tap the cog icon next to “Screen lock.” Setup the “Automatically Lock” features and make sure it is set to at least five seconds.

In this step you need to set up the app accessibility time. Click on the “Setting” button to open the Accessibility menu and set up the menu as required by you.


Find Greenify’s entry in this menu, tap on it, then click the toggle. A verification window will pop up to let you know what this setting does—allow Greenify to monitor what you’re doing and information from the active window—so click OK to enable it.


After all the set up and Greenify is ready for use,a message will pop-up explaining to your what the Greenify app does during hibernation,read carefully to get more understanding about the functionality of the app. After reading all the actions that will take place during hibernation tap Next.

Lastly the setting of Greenify app will require usage access. Tap the “Grant Permission” button here to continue with the app experience.

In the next window, tap on Greenify, then toggle Permit Usage Access to on to grant usage access.


Once
you are done with all the settings. Tap Finish to get started
using Greenify.

Get our updates delivered to your inbox
No comments:
Post a Comment