
Connecting two systems together has been an impossible mission to some people as to many whenever you ask them such question the answer definitely to them is no, but I have come to tell you that it is possible and am not just saying it just because I love writing but after following this article, you will know that it can be actualize with just few steps.
Sharing file between two PC has been the challenges most people do face daily because that moment when you just come across important file which you may want the other party to share to you and you may not have flash, USB Cable etc. in that kind of situation you may be confuse and don’t know what to do next but don’t worry for I have a good news for you. But let me ask you this question, do you know that you can connect two windows system together and also share file? If the answer is no, then I will clear your doubt that the answer is yes after you finish reading this article on how to turn your windows PC into wireless network hub.
Sharing file between two PC has been the challenges most people do face daily because that moment when you just come across important file which you may want the other party to share to you and you may not have flash, USB Cable etc. in that kind of situation you may be confuse and don’t know what to do next but don’t worry for I have a good news for you. But let me ask you this question, do you know that you can connect two windows system together and also share file? If the answer is no, then I will clear your doubt that the answer is yes after you finish reading this article on how to turn your windows PC into wireless network hub.
Read Also:How to Transfer Files From Android Smartphones to PC Using Wi-Fi
To get this happen we will be making use of the windows CMD. To access CMD on your just search for CMD in your windows search basically, I will be using windows 10 for this tutorials. After you might have found the CMD on your Windows System right click on it and run as an Administrator and with that you are set to go on with the tutorial on how to turn your windows PC into wireless network hub.
Before you can turn your windows into a network hub you must first all create a network in the windows system but you proceed with the creation of the network, check if your wireless adapter supports hosted network and to do that just type this code to your CMD netsh wlan show drivers and the result will display as shown on the image below.

If the generated output shows Hosted network supported: Yes, then you can continue with this tutorial but if not you can try using a USB wireless adapter that supports the feature.
How to Create Hosted network on windows
To create a network on your system is not a difficult task, so just relax your mind as we roll together on the step to step approach on how you can create a network on your PC.
· Open Command Prompt i.e. CMD right click on it and run as an Administrator
· After running the CMD as an Administrator proceed by entering this code netsh wlan set hostednetwor mode=allow ssid=dbencotech key=dbencotech
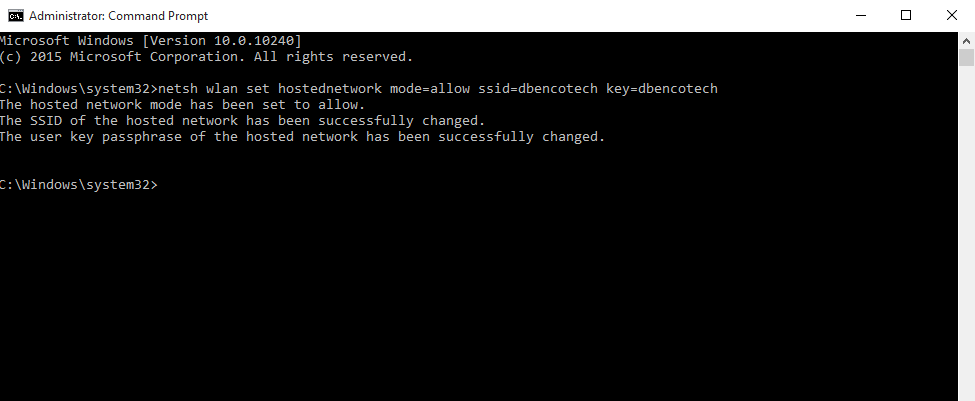
Note:- SSID is the name you want you network to bear change dbencotech to your desired name and also key is the password you want you network to use also change dbencotech to your desired password. Bravo you are done with creating a network on your windows system.
After you might have created network on your system the next thing, is to start sharing your connection between your system and a third party, to do this just follow the step by step approach below.
How to share internet connection with a hosted network on windows
· Open the command prompt and enter this codes netsh wlan start hostednetwork to start your network as shown below.

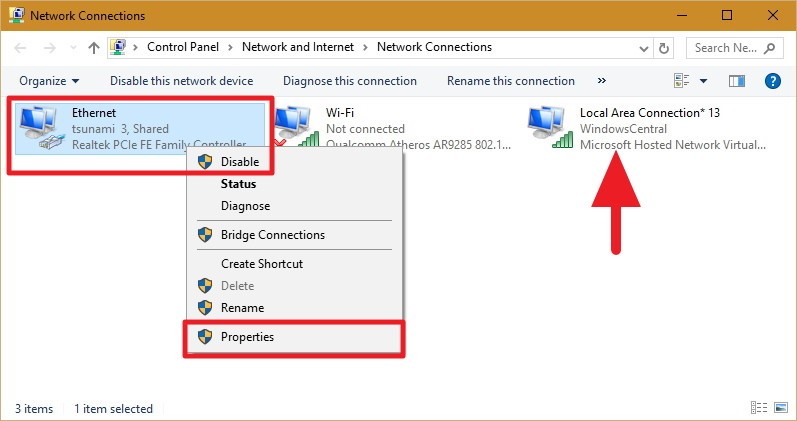
Next, proceed by right-clicking the network adapter with an internet connection – this could be a traditional Ethernet or wireless network adapter — select Properties.
Note: In Network Connections, you should now see a new our new Microsoft Hosted Virtual Adapter which is labeled Local Area Connection* X, and with the SSID name.
Click the Sharing tab option.
Check the Allow other network users to connect through this computer's Internet connection option.

· When you are done with all the process click OK to get connected.
Note:- Whenever you done and want to end the connection just type netsh wlan stop hostednetwork on your command prompt and that stop the network connection and also whenever you want to connect also use netsh wlan start hostednetwork just as we have done before.
Read Also:How to transfer files between android phone to PC using USB Cable
That just it on how to turn your windows PC into wireless network hub and I believe that you were able to follow along with the tutorial. Thanks for going through the tutorial and I hope it was helpful to you, don’t forget to share with other, so that they can also benefit too.
To get this happen we will be making use of the windows CMD. To access CMD on your just search for CMD in your windows search basically, I will be using windows 10 for this tutorials. After you might have found the CMD on your Windows System right click on it and run as an Administrator and with that you are set to go on with the tutorial on how to turn your windows PC into wireless network hub.
Before you can turn your windows into a network hub you must first all create a network in the windows system but you proceed with the creation of the network, check if your wireless adapter supports hosted network and to do that just type this code to your CMD netsh wlan show drivers and the result will display as shown on the image below.
If the generated output shows Hosted network supported: Yes, then you can continue with this tutorial but if not you can try using a USB wireless adapter that supports the feature.
How to Create Hosted network on windows
To create a network on your system is not a difficult task, so just relax your mind as we roll together on the step to step approach on how you can create a network on your PC.
· Open Command Prompt i.e. CMD right click on it and run as an Administrator
· After running the CMD as an Administrator proceed by entering this code netsh wlan set hostednetwor mode=allow ssid=dbencotech key=dbencotech
Note:- SSID is the name you want you network to bear change dbencotech to your desired name and also key is the password you want you network to use also change dbencotech to your desired password. Bravo you are done with creating a network on your windows system.
After you might have created network on your system the next thing, is to start sharing your connection between your system and a third party, to do this just follow the step by step approach below.
How to share internet connection with a hosted network on windows
· Open the command prompt and enter this codes netsh wlan start hostednetwork to start your network as shown below.
Use the Windows key + X keyboard shortcut to open the Power User menu, and select Network Connections.
Next, proceed by right-clicking the network adapter with an internet connection – this could be a traditional Ethernet or wireless network adapter — select Properties.
Note: In Network Connections, you should now see a new our new Microsoft Hosted Virtual Adapter which is labeled Local Area Connection* X, and with the SSID name.
Click the Sharing tab option.
Check the Allow other network users to connect through this computer's Internet connection option.
Next, from the Home networking connection drop-down menu select the Microsoft Hosted Virtual Adapter.
· When you are done with all the process click OK to get connected.
Note:- Whenever you done and want to end the connection just type netsh wlan stop hostednetwork on your command prompt and that stop the network connection and also whenever you want to connect also use netsh wlan start hostednetwork just as we have done before.
Read Also:How to transfer files between android phone to PC using USB Cable
That just it on how to turn your windows PC into wireless network hub and I believe that you were able to follow along with the tutorial. Thanks for going through the tutorial and I hope it was helpful to you, don’t forget to share with other, so that they can also benefit too.
Get our updates delivered to your inbox
thank u blogger
ReplyDelete